This post may contain affiliate links, which means I may receive a small commission should you decide to click that link and make a purchase. For more information please refer to the Terms & Conditions.
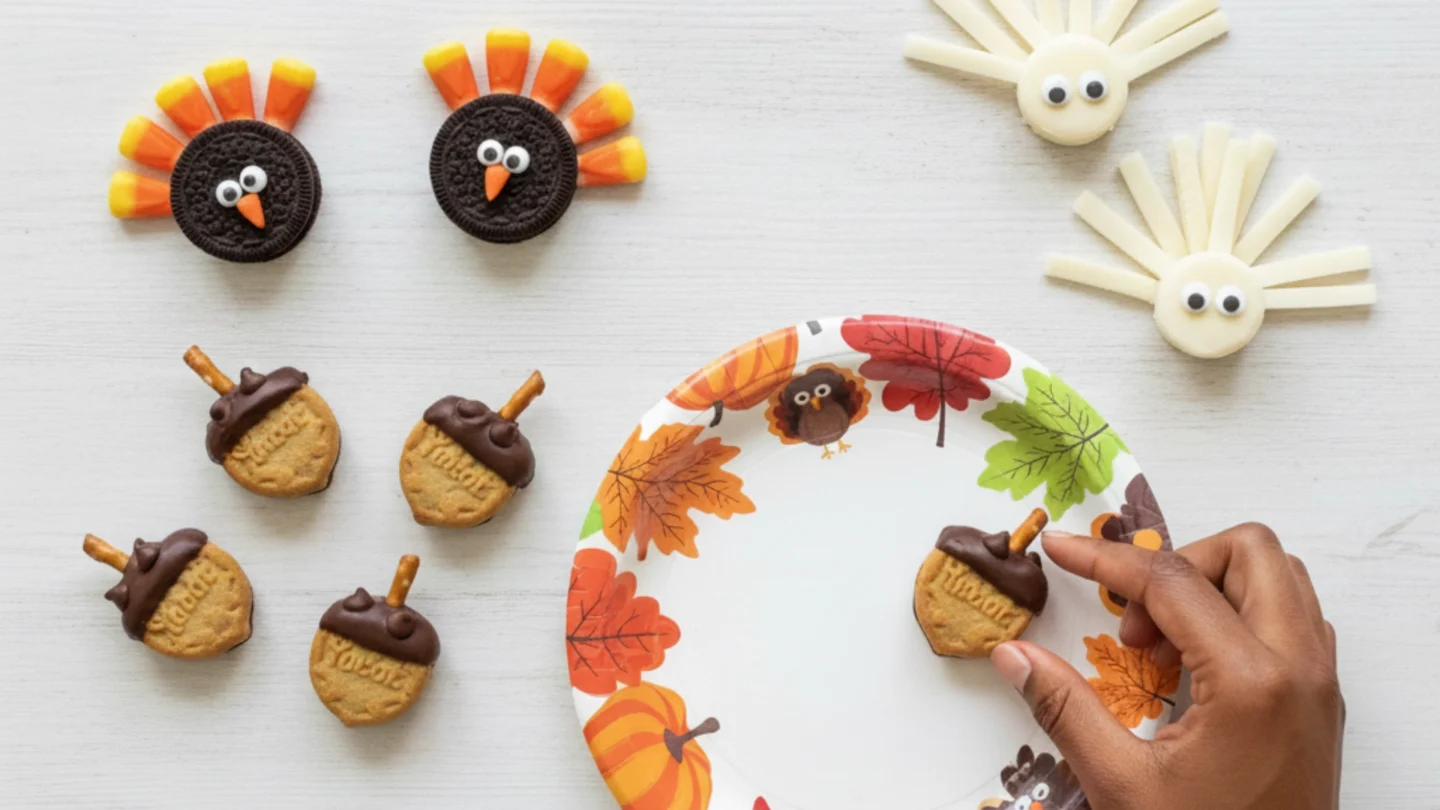
I used to dread the hours before the big Thanksgiving meal. My kids would run around and ask, “Is it ready yet?” every five minutes. I knew there had to be a way to avoid that pre-dinner chaos.
That’s when I discovered the power of fun Thanksgiving snacks for kids. I’m honestly obsessed with turning simple foods into something festive and cute. For me, it’s not just about feeding them.
It’s about creating a happy memory and changing the vibe of the whole day. These snacks are my secret weapon for a peaceful and happy afternoon. They get a “Wow!” from the kids and a “That’s so clever!” from the adults.
They are simple, perfect for little hands to help make, and totally worth it! Here are the 10 snacks that I make on rotation. I’ve broken down exactly what you’ll need and how to make each one, step by step.
These instructions are easy to follow, making snack prep a breeze, and your kids will love helping you make these delightful, fun Thanksgiving snacks for kids.
The Classic Turkey Veggie Tray
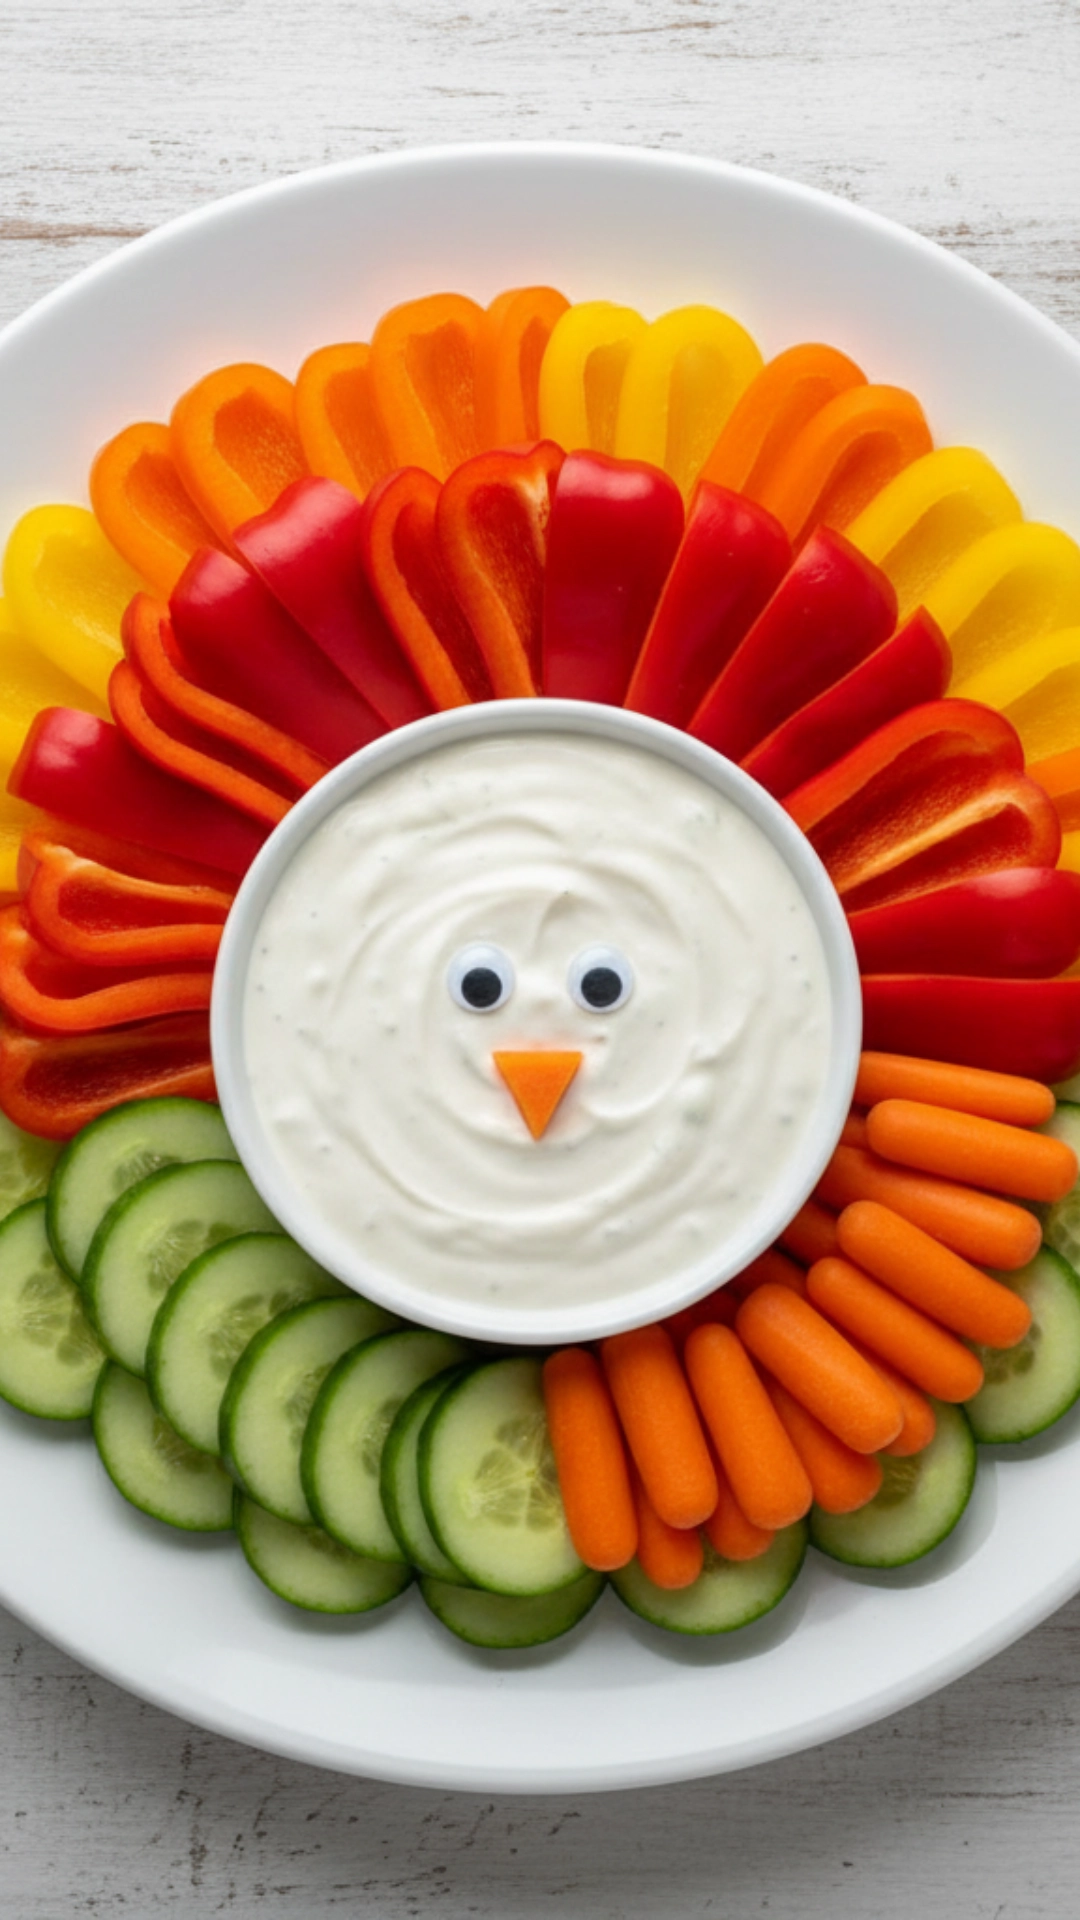
I love starting with this one because it’s colorful, healthy, and impressive. It’s my favorite way to sneak in some veggies before the big, carb-heavy meal. It also doubles as a fantastic centerpiece for the kids’ table.
What You’ll Need:
- A large, round serving platter
- 1 small bowl (for the dip)
- 1–2 cups of your favorite veggie dip (like ranch or hummus)
- 1 red bell pepper
- 1 yellow bell pepper
- 1 orange bell pepper
- 1 large cucumber
- 1–2 cups of baby carrots
- 1 cup of cherry tomatoes
- 2 candy eyes (or you can use two small olive slices)
- 1 small piece of cheese cut into a triangle (for the beak)
- 1 small piece of red bell pepper, cut into a “wattle” shape
Step-by-Step Guide:
- Start by washing and prepping all your vegetables. This is the part you can do hours ahead of time.
- Slice the bell peppers (red, yellow, and orange) into long, thin strips. These will be the primary “feathers.”
- Slice the cucumber into rounds or long spears, whichever you prefer. I find spears work well for dipping.
- Place your round serving platter on the counter.
- Fill the small bowl with your veggie dip and place it in the bottom center of the platter. This is the turkey’s body.
- Now, you get to build the feathers! Start by making a large fan shape around the top half of the dip bowl.
- Arrange the bell pepper strips in alternating colors (red, orange, yellow). Make this layer big and bold.
- Create a smaller fan inside the first one using the baby carrots.
- Using the cucumber spears, create a third fan inside the carrots. You want it to look full and layered.
- Use the cherry tomatoes to fill in any gaps at the base of the feathers, right against the dip bowl.
- Finally, give your turkey a face! Stick the two candy eyes onto the front of the dip bowl.
- Add the cheese triangle for the beak and the small red pepper wattle just below it.
My Pro-Tip: Get the kids to do all the arranging. You do the slicing, and they can build the “feather” rainbow. They love this part, and it gives them ownership over the dish.
Adorable Acorn Kisses
These are so simple, but I’m always shocked at their popularity. They are the perfect little bite of sweet and salty, and look adorable scattered on a dessert platter.
What You’ll Need:
- Mini peanut butter sandwich cookies (the small, bite-sized ones)
- Milk chocolate kisses (unwrapped)
- Mini chocolate chips
- Pretzel sticks
- About 1/4 cup of chocolate chips or chocolate frosting (to act as “glue”)
Step-by-Step Guide:
- Set up your assembly station. You’ll need a baking sheet lined with parchment paper.
- Melt the 1/4 cup of chocolate chips in the microwave in 20-second bursts until smooth. You can also use pre-made chocolate frosting.
- Take one chocolate kiss. Dab melted chocolate on the flat bottom.
- Press the flat side of a mini peanut butter cookie onto the chocolate kiss. Now the cookie is the “cap” and the kiss is the “acorn.”
- Break your pretzel sticks into 1-inch pieces.
- Dab a tiny bit of melted chocolate on the top of the cookie (in the center hole, if it has one).
- Stick the small pretzel piece into the chocolate. This is the “stem.”
- Place the finished acorn on the parchment paper to set. Repeat until you have a whole patch!
My Pro-Tip: Using a tub of chocolate frosting is way less messy than melted chocolate, especially if kids are “helping.” Just give them a toothpick to dab the frosting on.
Silly String Cheese Turkeys
I love these because they are a great protein-filled snack. They are also fun to make, pull apart, and eat.
What You’ll Need:
- Individually wrapped string cheese sticks
- Small, thin pretzel sticks
- Candy eyes
- Candy corn
- Fruit leather (red or orange) or a piece of cheese
Step-by-Step Guide:
- Unwrap a string cheese stick, but leave the bottom part of the wrapper on to use as a “handle.”
- Carefully push 5 or 6 thin pretzel sticks into the top of the string cheese stick. Fan them out so they look like a turkey’s tail feathers.
- About halfway down the string cheese, gently press two candy eyes into the cheese. You may need to use a tiny dab of cream cheese or frosting to make them stick, but usually, they press right in.
- Press the pointed end of a piece of candy corn into the cheese just below the eyes. This is the turkey’s beak.
- Cut a small, thin “wattle” shape from the red fruit leather or a small piece of cheddar cheese.
- Stick the wattle right next to the candy corn beak.
- Stand them up on a platter and watch the kids giggle.
My Pro-Tip: If the pretzels keep breaking, use a toothpick to poke small guide holes in the top of the string cheese first. Then, the pretzels will slide right in.
Candy Corn Oreo Turkeys
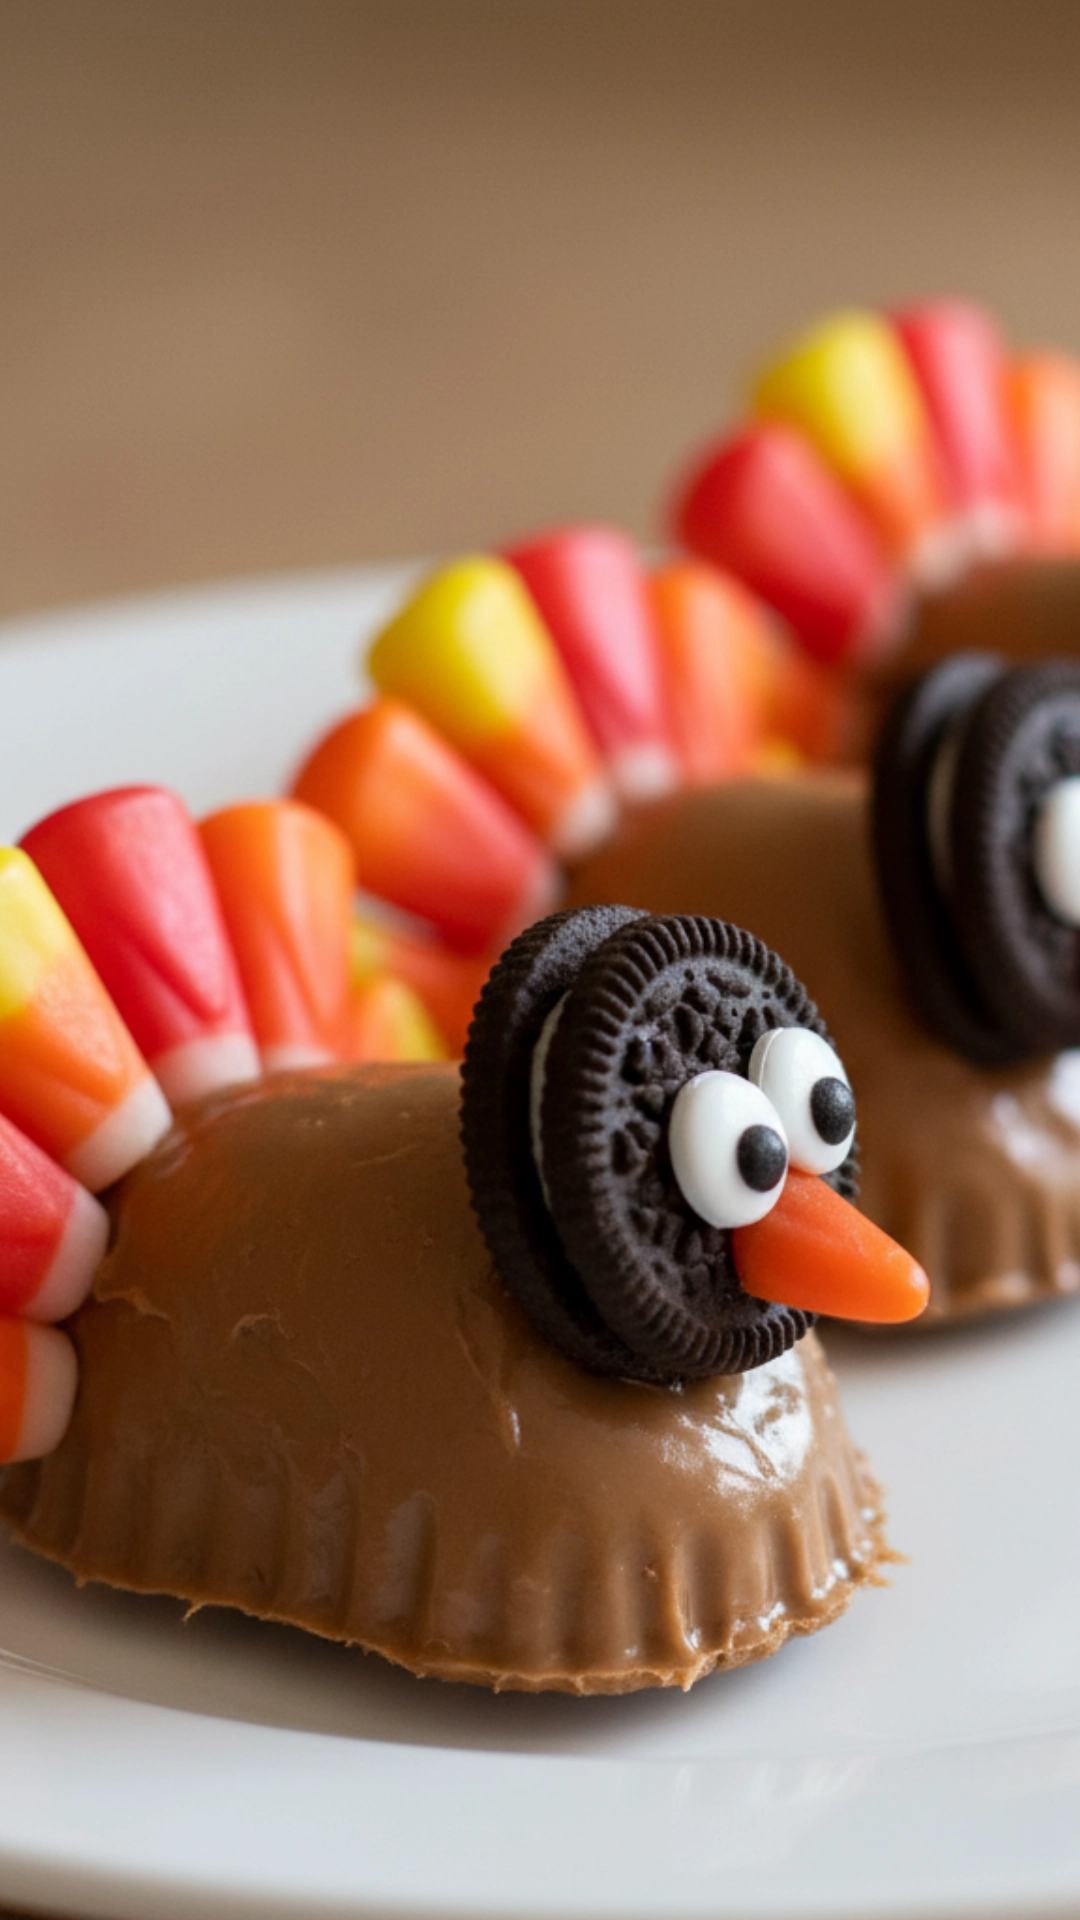
These are a Thanksgiving classic for a reason. They are pure, sugary fun. I usually limit these to just one per kid, but they are a massive hit.
What You’ll Need:
- Chocolate sandwich cookies (like Oreos)
- Mini peanut butter cups
- Candy corn
- Candy eyes
- Chocolate frosting (as “glue”)
Step-by-Step Guide:
- You will build this snack in two parts: the “body” and the “head.”
- For the body: Take one chocolate sandwich cookie. This is your base.
- Put a generous dab of chocolate frosting on the top-center of the cookie.
- Unwrap a mini peanut butter cup and press it, wide-side down, onto the frosting dab. This is the turkey’s body.
- For the head: Take another chocolate sandwich cookie. Carefully twist it open. You only need one half (the side with the cream filling).
- Use a knife to scrape the cream filling off carefully. Now you have a plain chocolate cookie wafer.
- Put a dab of frosting on the back of the peanut butter cup (the “body”).
- Press the plain cookie wafer onto the frosting, so it stands vertically behind the peanut butter cup. This is the back piece where the feathers will go.
- Now, stick the feathers on. Put small dabs of frosting on the pointed (white) end of 5 or 6 pieces of candy corn.
- Stick the candy corn, wide-side up, in a fan shape onto the standing cookie wafer.
- For the face: Stick two candy eyes onto the front of the peanut butter cup with frosting.
- Stick one more piece of candy corn, pointed side out, onto the peanut butter cup as the beak.
My Pro-Tip: This one has a lot of parts. I find it easiest to make an “assembly line.” You glue all the bodies, another kid sticks on all the heads, and another does the eyes.
Easy Fruit Cornucopias
This is my “fancy but fast” snack. A cornucopia is the horn of plenty, a great way to serve fruit. It feels so special.
What You’ll Need:
- Sugar cones (for ice cream)
- A mix of small fruits (grapes, blueberries, raspberries, small strawberry slices)
- A bit of melted chocolate or peanut butter (optional)
Step-by-Step Guide:
- This is the easiest one! First, prepare all your fruit. Wash everything and slice strawberries if you’re using them.
- Optional step: You can dip the wide, open rim of the sugar cone in a little melted chocolate and let it set. This makes it look extra special.
- Carefully fill each sugar cone with the mixed fruit.
- Let the fruit spill out of the opening slightly, like a cornucopia overflowing.
- Arrange them on a platter. That’s it!
My Pro-Tip: To keep the cones from rolling around on the platter, I put a small dab of peanut butter or cream cheese on the platter and “glue” the cone down.
Pretzel Pilgrim Hats
These are just adorable. They combine chocolate, caramel, and marshmallow, so you can’t go wrong. I love how they look like little cartoon hats.
What You’ll Need:
- Fudge-striped shortbread cookies (the round ones with a hole in the middle)
- Large marshmallows
- Dark chocolate candy melts or chocolate chips
- Yellow frosting (in a tube for writing, if possible)
- Parchment paper
Step-by-Step Guide:
- Lay out your fudge-striped cookies on a parchment-lined baking sheet, with the chocolate-striped side facing down and the plain side up.
- Melt your dark chocolate candy melts in the microwave per the package directions.
- Take one large marshmallow and dip the entire thing into the melted chocolate. Let any excess drip off.
- Immediately place the chocolate-covered marshmallow in the center of the cookie, right over the hole.
- Let this cool completely. To speed this up, put the baking sheet in the fridge for 10 minutes.
- Once the chocolate is set, take your yellow frosting.
- Pipe a small square “buckle” on the front of the marshmallow, right where it meets the cookie brim.
- You can also pipe a yellow line all the way around the base of the marshmallow to create a “hat band.”
My Pro-Tip: If the marshmallows are too big, snip them in half with kitchen shears before you dip them. A half-marshmallow often looks more in scale with the cookie.
Healthy Apple “Donut” Slices
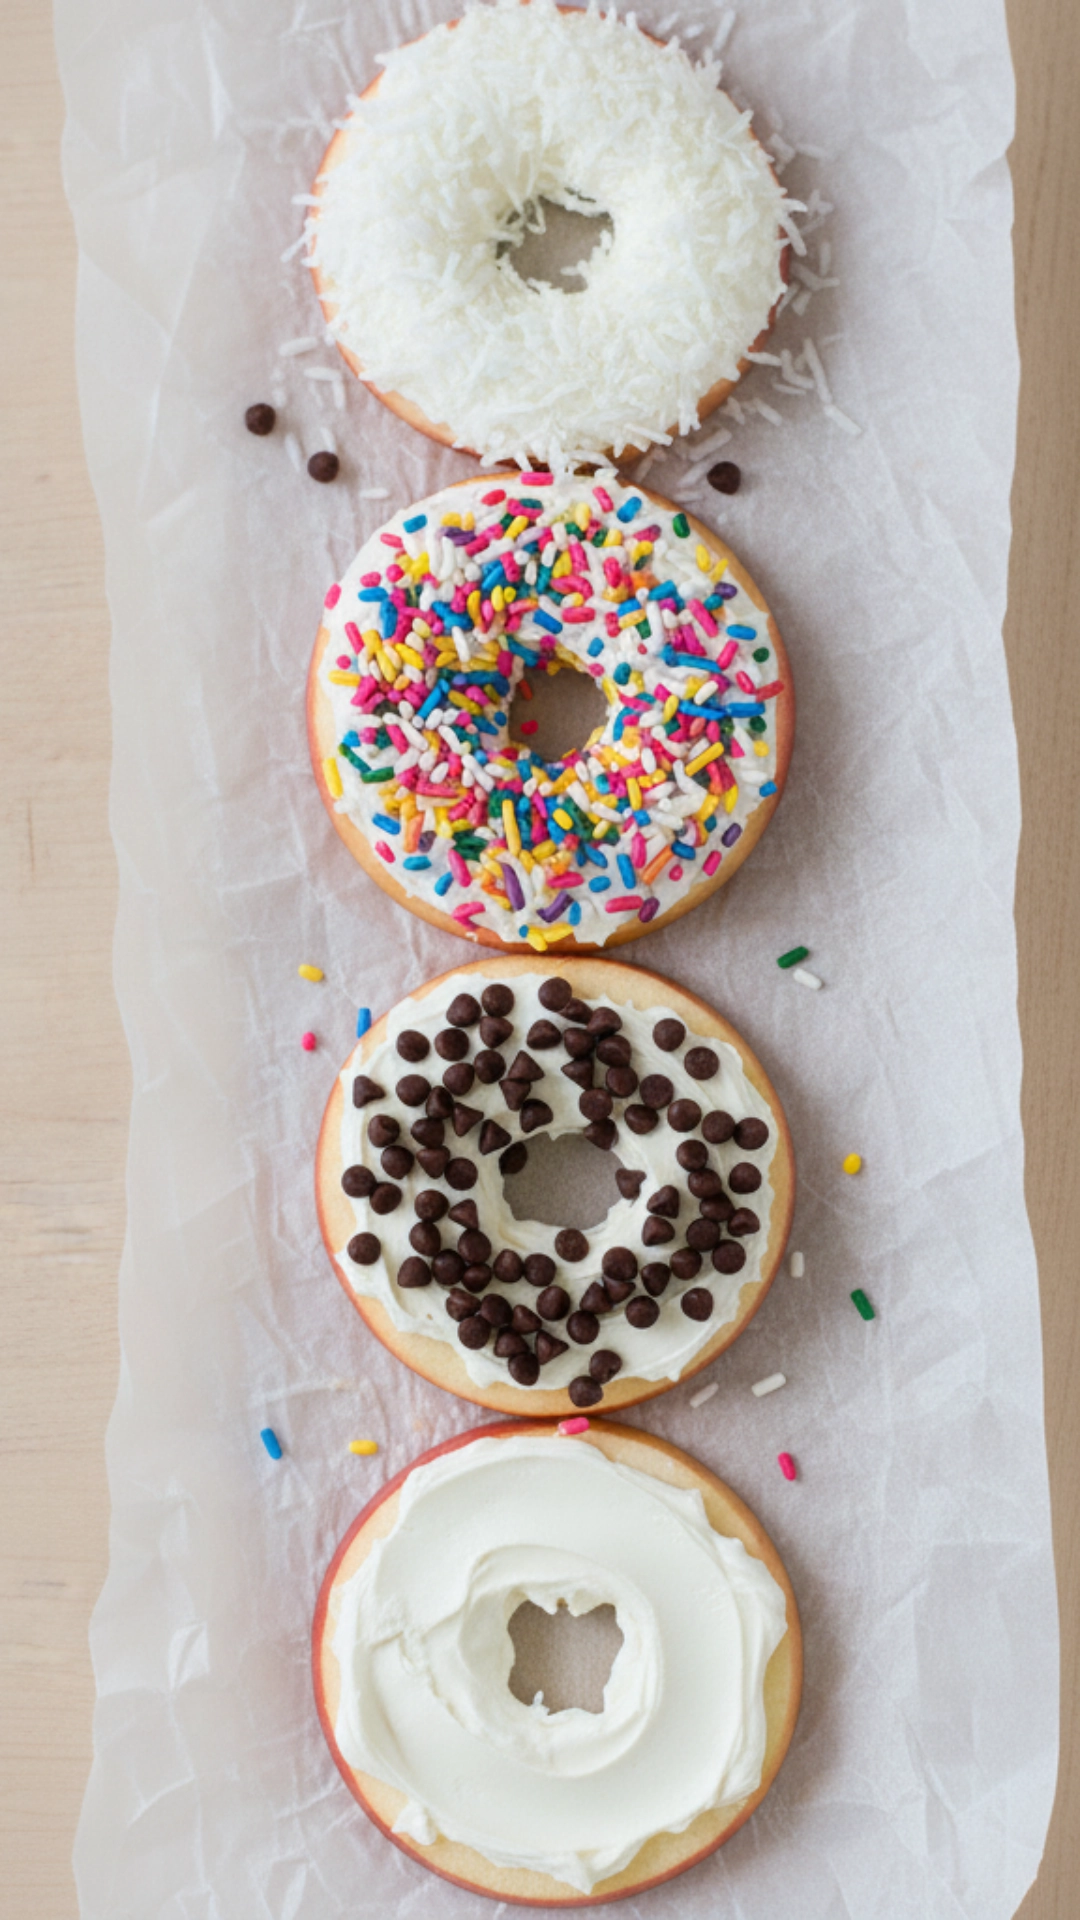
I turn to this snack when I feel the kids already have too much sugar. They get to decorate them, so they feel like a treat.
What You’ll Need:
- 2-3 large, crisp apples (like Honeycrisp or Gala)
- An apple corer (or a small round cookie cutter)
- Cream cheese, softened (or you can use peanut butter or sunflower butter)
- Various toppings: mini chocolate chips, sprinkles, shredded coconut, granola
Step-by-Step Guide:
- Wash your apples. Turn an apple on its side and slice it into thick, 1/4-inch rounds. You’ll get about 3-4 good “donuts” per apple.
- Use your apple corer or a small round cutter to punch out the core from the center of each apple slice. Now it looks just like a donut!
- Pat the apple slices dry with a paper towel. This is key to making the “frosting” stick.
- Use a knife or spatula to spread a thin layer of softened cream cheese (or peanut butter) on one side of each apple slice.
- Set up your toppings in small bowls.
- This is the fun part: Let the kids decorate their apple donuts. They can add sprinkles, chocolate chips, or whatever you’ve set out.
My Pro-Tip: If you make the apples ahead, dip the slices in a small water bowl with a tiny squeeze of lemon juice to prevent browning. Pat them dry before “frosting.”
“Pumpkin Patch” Pudding Cups
This is a perfect “mess-free” activity. The kids drink from their own cups. It’s a classic “dirt cup” with a Thanksgiving twist.
What You’ll Need:
- Individual-sized chocolate pudding cups
- Chocolate sandwich cookies (for the “dirt”)
- Small, pumpkin-shaped candies
- Green gummy candies (like gummy worms or sour straws, cut small for “vines”)
Step-by-Step Guide:
- Place your chocolate sandwich cookies in a plastic zip-top bag.
- Let the kids crush the cookies using a rolling pin or their hands. You want it to look like fine “dirt.”
- Open the chocolate pudding cups.
- Sprinkle a thick layer of the crushed cookie “dirt” over the top of the pudding.
- Now, let the kids build their pumpkin patch.
- Have them place 2 or 3 candy pumpkins on top of the dirt.
- Add a few small pieces of the green gummy candy next to the pumpkins to look like vines.
My Pro-Tip: I sometimes hide a few gummy worms in the pudding before adding the dirt. The kids get a fun surprise when they dig in.
Turkey Rice Krispies Treats
You can use store-bought or homemade treats for this. I love this because it uses up that extra candy corn from Halloween.
What You’ll Need:
- Pre-made (or homemade) Rice Krispies treats, cut into squares or circles
- Popsicle sticks or sturdy paper straws (optional)
- Candy corn
- Candy eyes
- Red and yellow frosting (in tubes)
- Chocolate-covered pretzels or pretzel sticks (for legs)
Step-by-Step Guide:
- If you want to make these into “pops,” gently press a popsicle stick into the bottom of each rice krispie treat.
- Press 5 or 6 pieces of candy corn, pointed-side in, into the top edge of the treat. This creates the tail feathers.
- Use a dab of frosting to “glue” two candy eyes onto the front of the treat.
- Use the yellow frosting to pipe a small triangle for the beak, right below the eyes.
- Use the red frosting to pipe a small “wattle” next to the beak.
- If you want to add legs, you can stick two small pretzel pieces into the bottom of the treat.
My Pro-Tip: If the candy corn won’t stick, first cut small slits in the Rice Krispies treat with a knife. Then, you can slide the candy corn right in.
Pumpkin-Shaped Mini Cheese Ball
This is the only one requiring more “adult” prep, but the final result is worth it. I make the cheese ball mixture the night before. This savory option is an excellent counterpoint to all the sweet, fun Thanksgiving snacks for kids you are making.
What You’ll Need:
- 8 oz block of cream cheese, softened
- 1 cup shredded sharp cheddar cheese
- 1/2 teaspoon garlic powder
- 1/2 teaspoon onion powder
- A pinch of salt
- 1 cup of crushed cheese crackers or tortilla chips
- 1 thick pretzel rod or a small piece of a celery stalk (for the stem)
- Crackers, for serving
Step-by-Step Guide:
- Combine the softened cream cheese, shredded cheddar, garlic powder, onion powder, and salt in a medium bowl. Mix well until it’s all combined.
- Lay out a large piece of plastic wrap. Scrape the cheese mixture into the center.
- Pull the sides of the plastic wrap up and twist them together, forming the cheese mixture into a ball.
- Place the cheese ball in the fridge for at least 1 hour (or overnight) to get firm.
- When you’re ready to serve, unwrap the cheese ball.
- Place the crushed crackers on a plate. Roll the cheese ball in the crumbs until it’s completely coated. This gives it the “pumpkin” orange color.
- Transfer the ball to your serving platter.
- Gently press your thumb or the side of a knife into the ball from top to bottom to create the pumpkin “grooves.” Do this 5-6 times around the ball.
- Break a thick pretzel rod in half and stick one piece in the top for the “stem.”
- Serve with more crackers.
My Pro-Tip: I let the kids do the rolling part. They love getting their hands messy (and you can put them in food-safe gloves) to roll the ball in the cracker crumbs.
My Tips for Making Thanksgiving Snacks with Kids
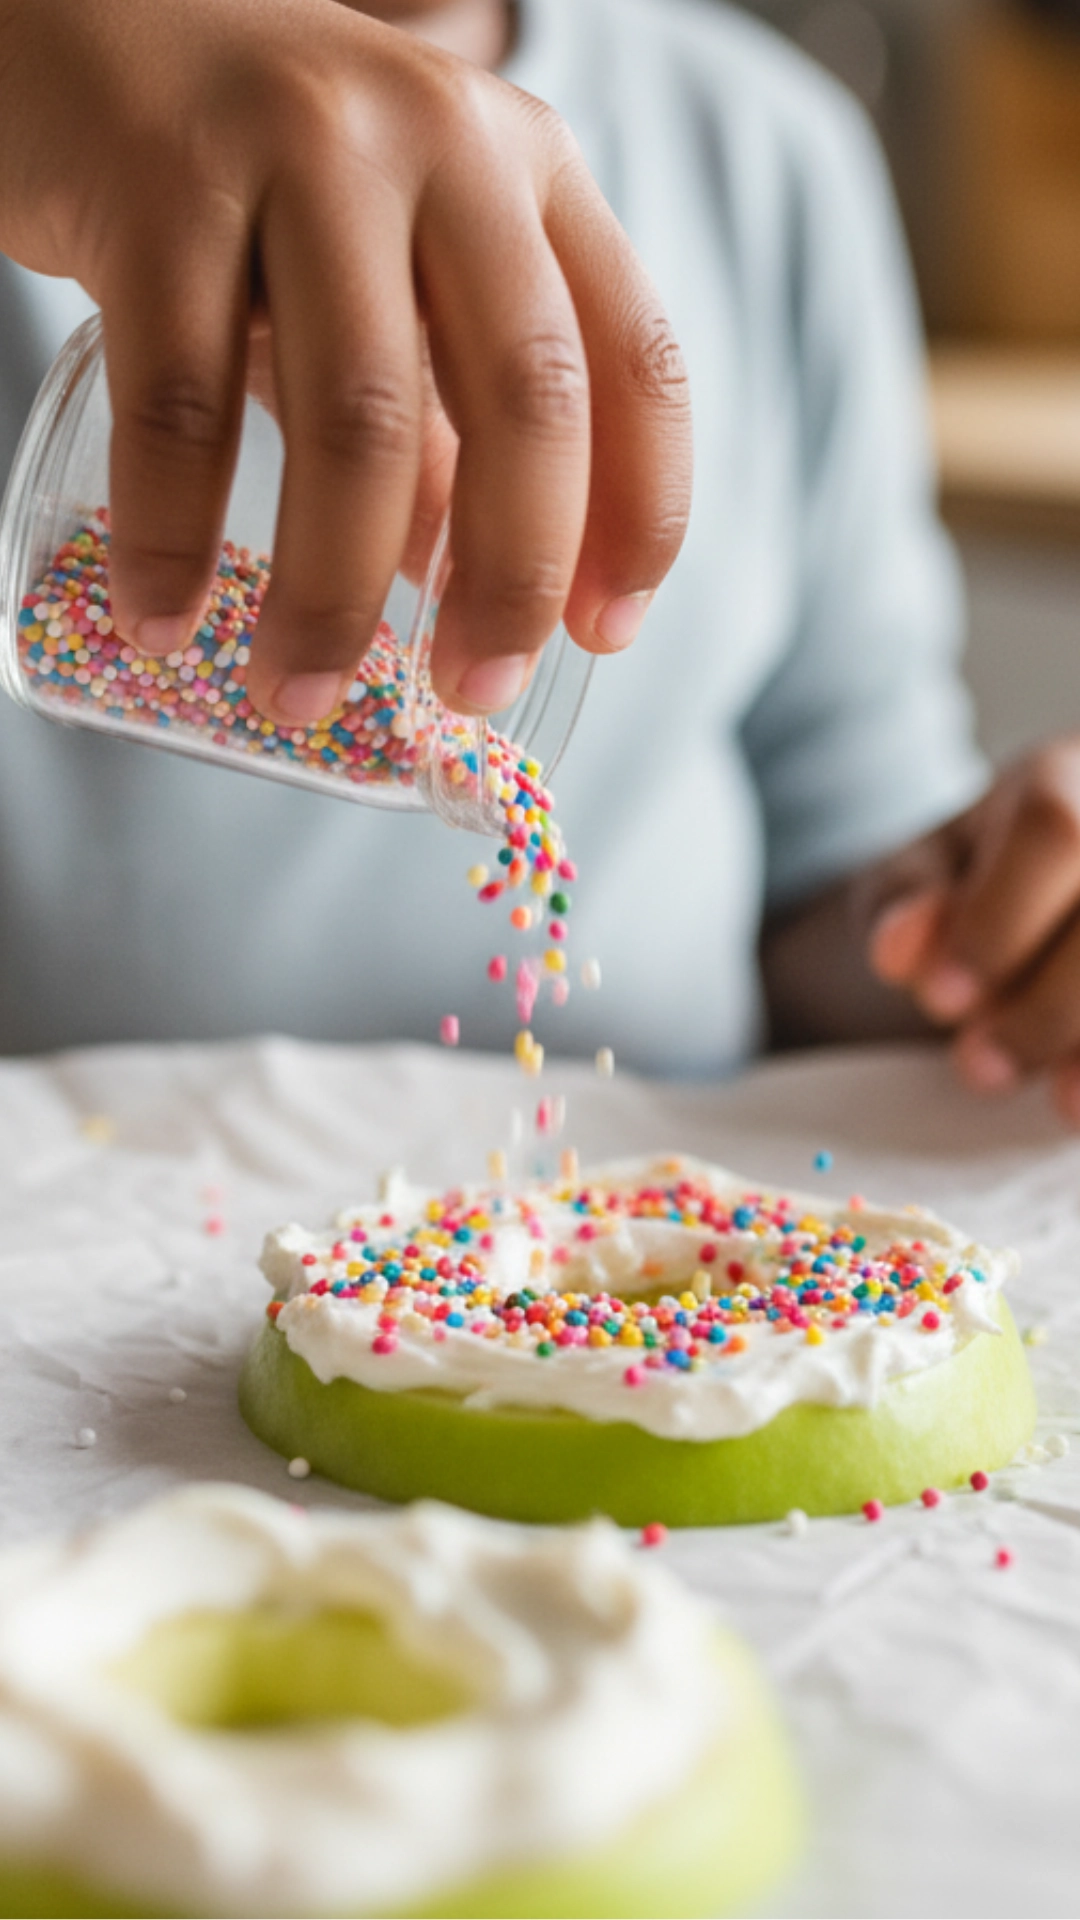
You have the recipes, but making them with kids can be… chaotic. I get it. I’ve learned a few things the hard way. Here are my hard-earned tips for keeping it fun and low-stress for you.
- Prep Everything First. This is my number one rule. Do all the slicing, washing, and melting before you call the kids over. Put all the little toppings (like candy eyes and sprinkles) into small bowls. This is called “mise en place,” and it’s a lifesaver. Kids have short attention spans; you want them to do the fun assembly, not wait for you to find the candy corn.
- Embrace the Mess. It’s going to happen. Put down a disposable tablecloth or some parchment paper. Have wipes ready. Just accept that frosting will get on the table. It’s easier to clean up one big, expected mess than to be stressed about every little spill.
- Safety First. You handle the knives and the hot, melted chocolate. Give the kids “safe” jobs, like pressing on candy eyes, arranging veggies, stirring the cheese ball (before it’s chilled), or crushing cookies in a bag.
- Let Them “Own” a Task. Kids love being in charge. Say, “You are the official sprinkle-master!” or “You are in charge of putting eyes on all the turkeys.” It makes them feel important and focused.
- Focus on Fun, Not Perfection. I promise your Oreo turkeys will not look like those on Pinterest. Mine never do. The candy corn will be crooked, and the frosting will be lopsided. It does not matter. The goal is a happy kid and a cute snack, not a food magazine cover. Laugh at the silly-looking ones.
How to Serve Your Thanksgiving Snacks
Don’t just hand the kids a snack and send them away—you can turn “snack time” into a mini-celebration! This is all about strategy.
Timing is Key: You don’t want them to fill up and not eat the main meal! The sweet spot is about 90 minutes to 2 hours before you plan to serve dinner. This is enough time to curb their hunger and keep them happily occupied while you finish your final dinner prep.
Set Up a “Kids’ Snack Station”: I love setting up a special station on a low coffee or card table. This keeps them happy and entirely out of your main kitchen prep area.
Make it Festive: Use fun, festive paper plates and napkins. Put the adorable Turkey Veggie Tray in the middle and surround it with the smaller, sweet snacks.
My Final Thoughts
I hope these ideas help you have a fun, delicious, and peaceful Thanksgiving. These fun Thanksgiving snacks for kids are more than just food; they are memory-makers. They are an excellent way to connect with your kids on a busy day.
They show your kids that the holiday is memorable for them, too. You don’t need to be a perfect chef to pull this off. Just be willing to have a little fun with some candy eyes, string cheese, and pretzels.
I know you can do it, and these snacks will be a huge hit! Happy Thanksgiving!
